
Have you ever visited a website where it seemed like the pages were all over the place? Each page was telling a different story, and it was challenging to piece together what the overall message of the website was. This is often caused by a lack of planning – from not having an overarching storyboard in place.
A storyboard is a document used to plan the content of your website pages. It’s how you ensure that each page contributes to an overall cohesive message and that visitors can easily find the information they need. This guide will show you how to create an effective storyboard for your website.
What Does a Storyboard Look Like?
A storyboard is a document that includes detailed information on each page of your website. It outlines the page’s goal, the target audience, and any other relevant details about content or design elements you want to include. Most storyboards contain some combination of text, images, sketches/wireframes, and user flows.
Why Is a Storyboard Important?
A storyboard is the foundation of any website project. It’s an opportunity to plan out how your website pages will work together and make sure that each one serves its own purpose in communicating with the visitor. Creating a storyboard ensures that the user experience on your website is consistent and cohesive and that your message is effectively communicated.
How to Create an Effective Storyboard
Creating a storyboard involves multiple steps, but don’t worry — it’s not as difficult as it sounds! Here are the steps you’ll need to take:
1. Compile Your Content
Whether you’re creating a storyboard for a new website or revamping an existing one, the first step is to compile all your content. This includes any text, images, videos, and other media that you know you want to include on your website. The idea is to get a clear understanding of what you have to work with.
2. Sort & Organize Your Content
Once your content is compiled, start putting it into categories or topics. Work your way from the broad topics down to more specific ones until you can determine how they fit into your overall website structure. This will also help you decide which pages need to be included in your storyboard.
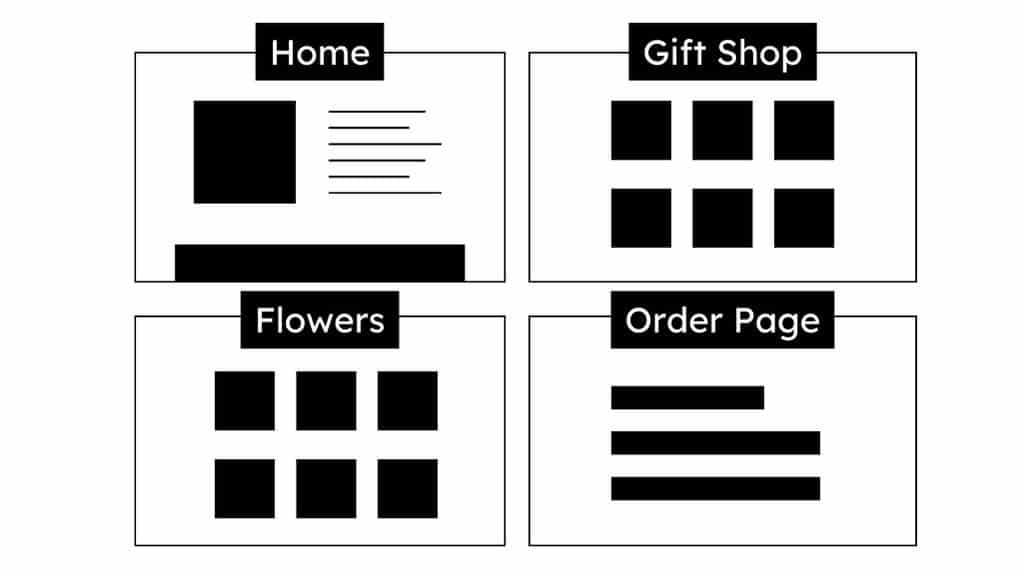
For instance, if your website is about photography services you offer, you may have topics such as “wedding photography,” “portrait photography,” and “commercial photography.” Each of these can then be broken down into more specific topics, such as “packages & pricing,” “sample images,” etc.
This doesn’t necessarily have to be the final way your pages are organized, but it will help you get a better idea of how much content you have and how it should be best organized on your website.
3. Structure Your Storyboard
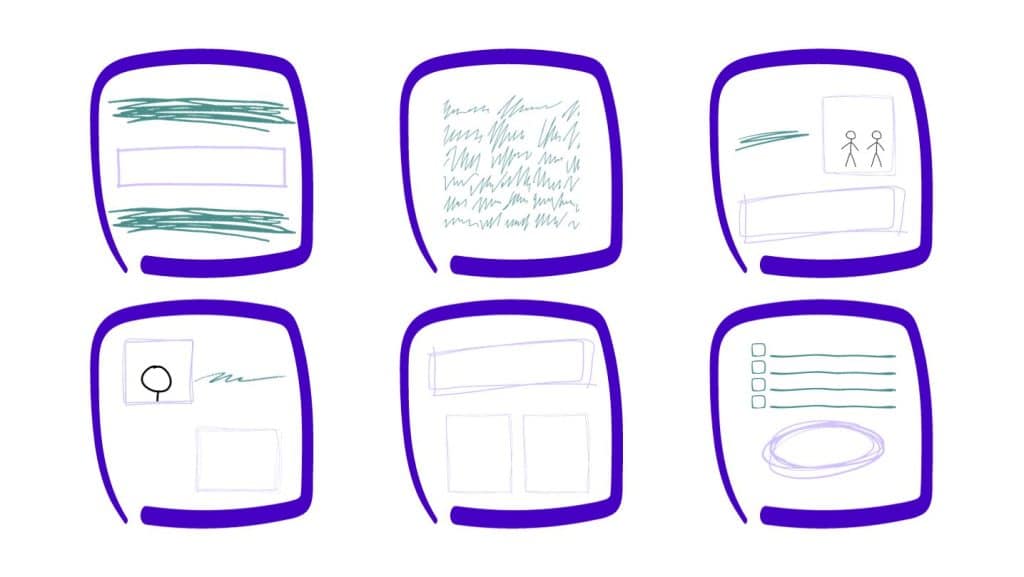
Now that your content is organized, it’s time to structure the actual storyboard. Start by creating a basic outline of each page on the website. Include relevant details such as the page title, description, subheadings, content, and any other information you think is essential (e.g., images, videos, etc.).
Once you’re happy with the structure of your storyboard, you can add more details such as user flows and design ideas. Think about how the user will experience each page – what are their goals? How do they move around on the page? What kind of visual elements will be included to make it visually appealing?
At this point, you’re still thinking of each page as separate entities, so don’t worry about how they fit into the overall website structure yet. This is known as wireframing, and it’s an important step in the storyboarding process.
4. Map Out Your User Flows & Navigation
Now, it’s time to start planning how visitors should be able to navigate through your website. Think about the different paths they could take and create user flows that make sense. User flows are the paths visitors take on your website. In other words, they’re the sequence of pages a visitor goes through when interacting with your site.
For instance, referring to the same photography website example as before, one user flow could be: Home Page > Services > Wedding Photography > Packages & Pricing. This is just one possible user flow – another person might go through a different one, such as Home Page > About Us > Past Clients > Contact.
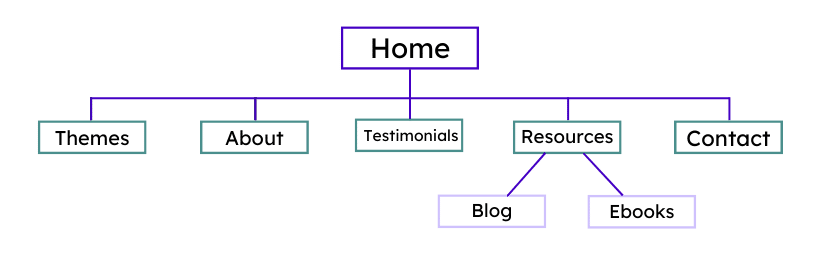
At this stage, you want to map out as many user flows as possible and create a navigation system that makes sense. This is where the storyboarding process comes full circle – you started with individual pages, and now you’re joining them together into one cohesive website structure.

5. Plan the Menu Structure
Now that your user flows are mapped out, it’s time to plan the menu structure. This is how visitors navigate your website, so it needs to be intuitive and easy to use. Think about the most important pages and put them in a logical order – for instance, the homepage should always be first.
The menu structure should also be clear and concise. Avoid having too many items, as this can make it harder for users to find what they’re looking for. Your goal is to lead users naturally from one page to the next – make sure your storyboard reflects this. Focus on the labels, too, and ensure they accurately describe each page’s content.
This is where you’ll want to consider what type of navigation to use. You may choose a traditional dropdown menu structure or opt for something more creative such as an interactive slider, breadcrumb trail, etc.
Similarly, you’ll also want to consider whether you’ll go for a linear, hierarchical, or tabbed navigation approach. The difference between these is subtle but important – understanding which one to use will help you create a better user experience.
The end result here will essentially be a site map of how each page on your website will fit together – laying out a bird’s-eye view of your overall website structure. You’ll use this to build your actual website, so make sure it’s as detailed and accurate as possible!
6. Test & Fine-Tune Your Storyboard
Once you have your menu structure in place, it’s time to finesse the details of your storyboard.
Take a look at each page and make sure everything is in order – review the page titles, descriptions, headings, etc., and refine as necessary. Imagine if you were a user and ask yourself: “Does this page make sense? Is it easy to navigate and find what I’m looking for?”
Go a step further and imagine yourself going through a specific user flow. Does it feel natural? Are there any elements that could be removed or added to make the process smoother?
Another important step at this stage is to test your storyboard with actual users. Ask people to go through your storyboard and provide feedback on the user experience. This can help you spot any problems you may still need to look into, such as confusing navigation or unclear page titles.
7. Add Final Touches
Finally, it’s time to bring it all together. Take a step back and look at your storyboard from a holistic perspective — how do all the pages work together? Do you need to make any changes for the storyboard to flow better?
At this stage, you may want to add some finishing touches, such as images, videos, or animations. These elements can help bring your storyboard alive and make it more engaging.
Once you’re happy with the final version, your storyboarding process is complete! Congratulations – now you have a detailed plan of how to create an awesome website that’s designed with the user in mind. From here, it’s time to start building!
Tools for Storyboarding
To help you get started with storyboarding, there are a variety of tools available. These range from free web-based tools to more advanced software packages. Here are some of the best options:
- Adobe XD – Known for its robust design features, Adobe XD can be used to create detailed storyboards from scratch all the way to the finished prototype.
- Figma – This collaborative design platform lets you and your team work together on storyboards in real time.
- InVision – Another industry-leading tool for creating storyboards and prototypes, InVision, allows you to easily create interactive prototypes that can later be turned into HTML and CSS for development.
- Sketch – With plenty of templates and plugins available, Sketch is a great choice for designing user flows quickly and easily. However, it’s only available for Mac users.
- Balsamiq – This simple yet powerful web-based tool is great if you’re a beginner and want to get your storyboard up and running quickly. It offers a drag-and-drop interface, making it easy to use.
- UXPin – A great option for creating wireframes and storyboards quickly and collaboratively, UXPin offers an intuitive user interface and plenty of features to help you get the job done.
- Microsoft PowerPoint – A basic but effective option, PowerPoint can be used to quickly create a simple storyboard in just a few clicks.
You Can Also Do It Manually!
If you don’t want to use any of the tools listed above, you can also do it by hand. All you need is a piece of paper and a pencil. This can be a great option if you’re just starting out, as it allows you to quickly put your ideas on paper without the hassle of learning how to use any software packages. It’s also useful if you want to brainstorm some quick ideas before committing to more detailed storyboarding.
At the end of the day, storyboarding is all about bringing your ideas to life — so whatever method works for you is the best one! It doesn’t matter if you use software packages or do it by hand as long as you have an effective plan in place for how your website will look and function.
Ready to Storyboard?
It might not seem like it, but storyboarding is an essential step of the website development process. Done right, it saves you time, money, and resources by ensuring that everything is planned out before you start coding. No one likes bad surprises, and storyboarding helps you avoid them. It’s also a great way to get everyone on the same page (be that your client or internal team) before the project gets underway.
So if you’re ready to create an amazing website experience for your users and put your vision into action, it’s time to start storyboarding! And if you still feel like you need help organizing your thoughts and ideas, feel free to reach out to our ShiftWeb team – we’re here to help you every step of the way, from sketches to launch!


